- Use the Live Monitor feature:
- Go to the Gateway page → click on the NeoFlow tab.
- Click Live Monitor → then click Monitor.
- Check the following statuses:
- Processor Status: Should show Execution Success, meaning the Gateway is operating normally.
- OT Device and IT Service Status: Should show Connection Success, indicating communication is normal.
- Basic Information
- Connection Established: After successfully connecting with NeoEdge.
- Manual Update: Users manually execute the update.
- App Information
- After NeoFlow Sync is completed, updates occur every 10 seconds within the first minute.
- Scheduled Update:Once every 24 hours.
Yes, after completing the Sync NeoFlow to Gateway process, the Gateway will automatically retrieve data from OT devices based on the NeoFlow configuration and transmit the data according to the IT Service settings.
- OT Device Profile:
A communication configuration template for OT devices, including communication type, parameters, and data request parameters. It can be quickly configured in NeoEdge Central and reused in NeoFlow. - IT Service Profile:
A server connection configuration template for IT services, including server type, parameters, and authentication CA files. It can be quickly configured in NeoEdge Central and reused in NeoFlow.
It will not affect the original profiles. The OT Device Profile and IT Service Profile are template settings, and the edits in NeoFlow only apply to the current configuration, without changing the original profile content.
- Possible reasons:
- Insufficient License: Your company’s NeoEdge X License limit has been reached, preventing the addition of more NeoFlows.
- Insufficient Permissions: Adding a NeoFlow to a Gateway requires Application Management permissions.
- How to fix it:
- Check the NeoEdge X License status:
- Log in to NeoEdge Central.
- Go to the Company Account page.
- Switch to the NeoEdge X License tab and check if the license limit has been exceeded.
- Handle insufficient licenses: If licenses are insufficient, you can contact an admin to purchase more or release unused licenses by deleting unused NeoFlows.
- If not, contact your admin to grant the required permissions.
- Check if you have Application Management permissions.
- If not, contact your admin to grant the required permissions.
- Check the NeoEdge X License status:
- How to change the Serial Port Interface (RS 232, RS 485)? Please refer toHow to Configurate Serial Port Interface
- How to modify other settings of the Serial Port?
- Log in to NeoEdge Central and go to the Gateway page.
- Open the Gateway Profile tab and select the Gateway you need to edit.
- Click Edit to adjust the mount path of the Serial Port, and configure parameters (such as baud rate, data bits, and stop bits) according to the OT device protocol.
- Refer to your IPC manual to confirm the correct COM Port path.
- Save the changes and retry the Sync operation.
- Possible reasons::
- The communication protocol settings on the OT device are incorrect.
- The Gateway’s Serial Port settings don’t match the device configuration.
- How to fix it:
- Check the protocol parameters on the OT device (e.g., baud rate, data bits, stop bits, Slave ID).
- Log in to NeoEdge Central, go to the Gateway Profile tab, and verify the Serial Port Connection Settings.
- Save the settings and retry data retrieval after ensuring configurations match.
- NeoFlow
- Supported Architectures:
- x86-64
- arm64
- Supported Operating Systems:
- Ubuntu 20.04 x86-64
- Ubuntu 22.04 x86-64
- Debian 11 AArch64
- Supported Architectures:
- Remote Desktop Service
- Supported Architectures:
- x86-64
- Supported Operating Systems:
- Ubuntu 22.04 Desktop OS LTS
- Windows 10/11 OS
- Windows Server 2022
- Solution: Remote Desktop Service
- Supported Architectures:
These systems have been fully tested and are guaranteed to be compatible.
If you plan to use other OS versions, we recommend contacting our technical team first to confirm compatibility and avoid potential system issues.
- How to fix it:
- Download and install Azure IoT Explorer.
- Log in with your Azure account and connect to the corresponding IoT Hub.
- Browse the device list and select the target device.
- View the telemetry data stream to verify if the data has been successfully uploaded.
- Possible reasons::
- Insufficient admin privileges: The command must be executed by a user with sudo privileges.
- Expired Command: The installation command is only valid for 24 hours after being generated. If it’s expired, it won’t work.
- Network Issue: The device isn’t connected to the internet, causing the installation to fail.
- Version mismatch: The selected OS version for NeoEdge X during Gateway setup doesn’t match the device’s actual hardware architecture or operating system.
- How to fix it:
- Obtain admin privileges:
- If you see the error message user is not in the sudoers file. This incident will be reported, it means the current user doesn’t have sudo permissions.
- Contact your system administrator to grant privileges, or try again using an account with sudo access.
- Verify network connectivity:
- Run ping google.com on the device to ensure it is active, properly configured, and has external network access.
- Check the command status:
- Confirm the command was generated within the last 24 hours and hasn’t been used before.
- Generate a new command:
- If the command has expired, log in to NeoEdge Central and generate a new one. Try the installation again.
- Check hardware and OS compatibility:
- Ensure the OS version selected during Gateway setup matches the device’s hardware and OS; if not, update the device settings or reconfigure the Gateway.
- Obtain admin privileges:
- Possible reasons:The device isn’t properly connected to the network, or the required communication ports are not enabled.
- How to fix it:
- Check network connection::
- Run ping google.com on the device to ensure it is active, properly configured, and has external network access.
- Verify port status::
- Ensure the device has ports 443 and 8883 open for external connections. Run the following commands to check the port status:
- echo | openssl s_client -connect mqtt.neoedgecentral.com:8883 2>/dev/null | openssl x509 -text
- echo | openssl s_client -connect pic.neoedgecentral.com:443 2>/dev/null | openssl x509 -text
- Ensure the device has ports 443 and 8883 open for external connections. Run the following commands to check the port status:
- Check network connection::
If the connection fails, check firewall settings or contact your network administrator for assistance.
- Not currently.A single Gateway cannot be assigned to multiple projects simultaneously.
- If you need to move a Gateway to another project, follow these steps:
- Remove the Gateway from the original project::
- Log in to NeoEdge Central, navigate to the Gateway’s current project.
- Ensure the Gateway has completed all data processing, then safely remove it.
- Reassign the Gateway to a new project::
- Switch to the target project, add the Gateway, and complete the configuration and installation process.
- Remove the Gateway from the original project::
Important Reminder:
Moving a Gateway between projects is irreversible, and the data from the original project cannot be recovered. Before proceeding, make sure to review the project content thoroughly and back up all necessary data.
- Possible reasons:To meet information security requirements, the Gateway is designed not to automatically enable RDP connections by default. As a result, after a Gateway reboot or recovery, RDP cannot reconnect automatically as part of its security design.
- How to fix it:
- Close the RDP tab.
- Restart the RDP service to restore connection functionality.
- Possible reasons:This is usually because the clipboard function in your browser is turned off. The clipboard is what handles copy and paste, so if it's disabled, those actions won't work.
- How to fix it:Turn on the clipboard feature in your browser.
- Here are the steps for common browsers:
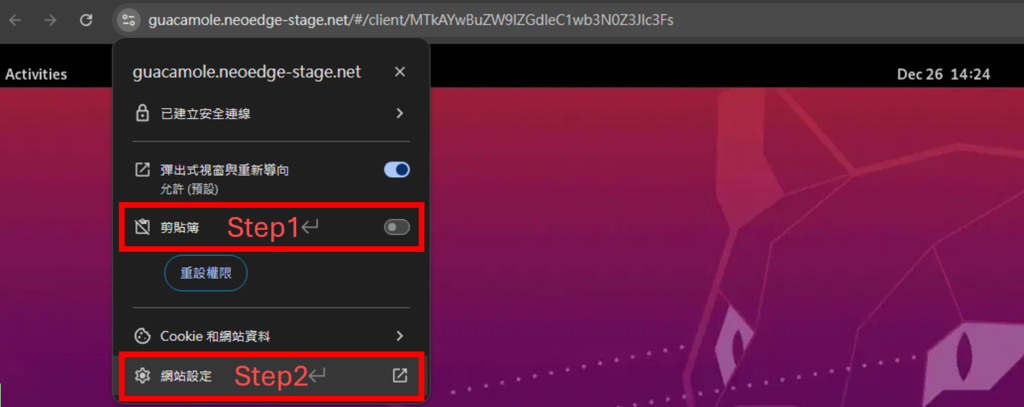
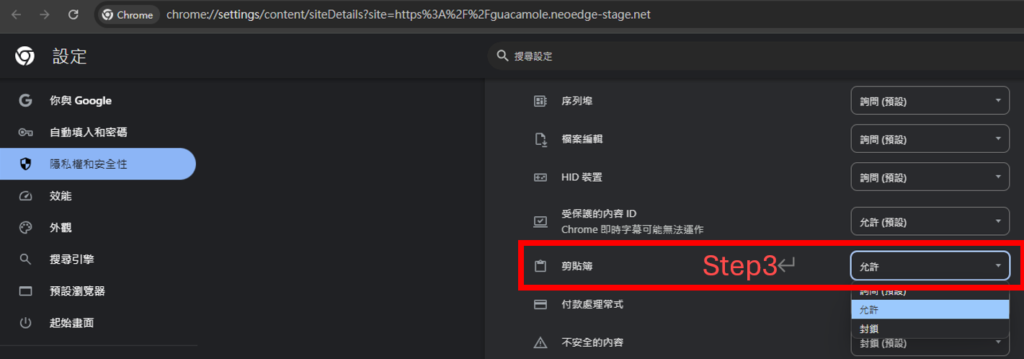
- For Chrome:Click the settings icon next to the RDP URL on the left.
- Step 1: If you see a "Clipboard" option, simply turn it on.
- Step 2: If there's no "Clipboard" option, go to "Site Settings."
- Step 3: Enable the "Clipboard" option by selecting "Allow."
- For Chrome:Click the settings icon next to the RDP URL on the left.
- Here are the steps for common browsers:
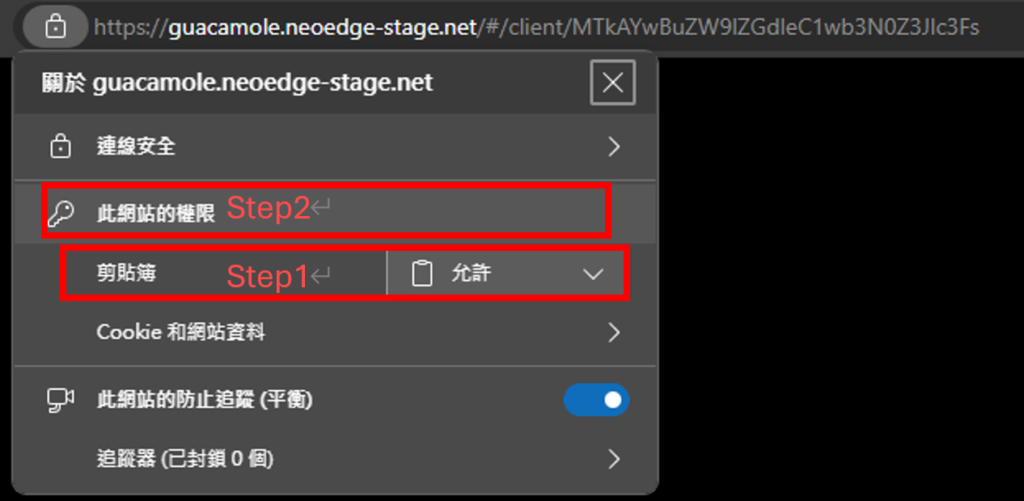
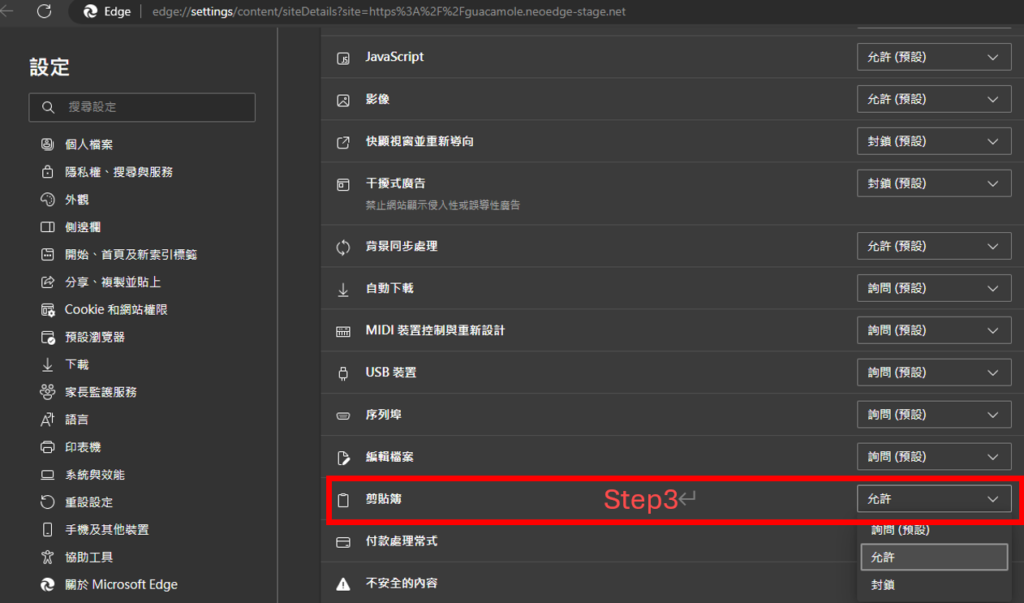
- For Edge:Click the settings icon next to the RDP URL on the left.
- Step 1: If you see a "Clipboard" option, simply turn it on.
- Step 2: If there's no "Clipboard" option, go to "Site Settings."
- Step 3: Enable the "Clipboard" option by selecting "Allow."